|
Perhaps the most common device for
measuring lengths is the ruler or meter stick. It is difficult,
however, to estimate fractions of each division, so if greater precision
is required, certain refinements must be made.
The Vernier caliper is a device that
employs an auxiliary (Vernier) scale which permits more accurate
measurements of small fractions of a main scale division. The
Vernier scale consists of N equally spaced divisions which have
the same total length as (N - 1) main scale divisions. On
the Vernier caliper, the main (stationary) scale is divided in to
millimeters. The Vernier (moveable) scale is 9 mm long and
consists of 10 divisions. Each division on the Vernier scale,
then, is 0.9 mm long, or 0.1 mm less than the main scale
divisions. Therefore, the number of the Vernier line which is best
aligned with a line on the main scale is equal to the number of tenths
of a millimeter beyond the the last reading of the main scale at the
zero mark on the Verneir scale.

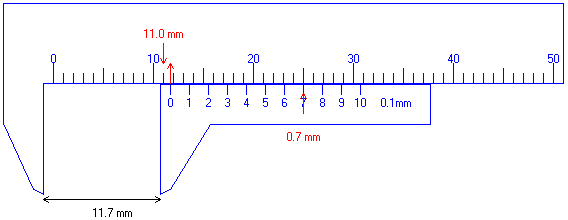
Fig.
1 - Vernier caliper
Study the above figure.
The caliper jaws are extended 11.7 mm. First of all, you can tell
that the zero mark of the Vernier scale (indicated by the left-most
upward arrow) has passed the 11.0 mm mark (indicated by the downward
arrow) on the main scale. The number of the Vernier line which is
best aligned with a line on the main scale is 7 (indicated by the
right-most up arrow). Therefore, the zero mark of the Vernier
scale has gone 7 tenths of a millimeter past the 11.0 mm mark, giving a
total reading of 11.7 mm. The least count of the Vernier caliper
is 0.1 mm. That is, 0.1 mm is the smallest scale reading that can
be made without estimation.
Practice reading the
Vernier caliper below! When the java applet loads, click and drag
on the picture with the mouse to position the caliper for a new
measurement. You can read the value by using the above method.
To verify your measurement, type your reading in the provided box then
press the enter key. The "Reset" key sets the Caliper at
the 0.0 mm position. You can set the Caliber on tutorial mode by
selecting the "show" checkbox. When in tutorial mode, three red arrows and number displays are provided,
as above, to help you make the reading. The first two arrows help
you get the measurement in millimeters. The third helps you read the
decimal.
|