

How To... Format and Print a Saddle-Stitch booklet
What's Saddle Stitch?
Saddle stitching is a method of binding books and zines, where the sheets/spreads are folded and stitched together down the spine.
Because the sheets are stitched down the middle, you'll be printing four pages to each sheet, and you won't be printing them in the order they're read in. Don't let this scare you! They'll be in the right order once you have them binded. You'll have to make sure that your pages are arranged in the right order for printing, though. You can use software like Adobe Indesign for this process, which is called imposition. Some of these steps may be familiar to you if you've taken Intro to Graphic Design and had to format and print your process book.
I wrote these instructions assuming that you have a basic knowledge of Indesign's interface. You can currently get the Adobe suite for free through the school by logging into Adobe's website with your App State credentials. Don't pay for Adobe yourself if you can help it. Subscription based software is a plague.
You can also use the computers in the library, but I would not recommend doing serious Indesign work on them without a personal flash drive that you can keep your files on. Unlike Photoshop, Indesign doesn't embed the actual data of any images that you place into the program, instead linking to them from wherever you have them located on your machine. If you move any of the files you're using anywhere else, they will break. Any images you're placing in an Indesign file need a permanent home to live in (and it better not be your Downloads folder or else I will find you). Using Indesign with files you have saved to a library computer and nowhere else runs the risk of your file breaking forever if someone else ends up deleting them. Don't be that guy in my Digital Media Composition class who did his work on the library computers and was surprised that the images wouldn't load when he opened them on the classroom computers.
You Will Need...
- Adobe Indesign
- Adobe Acrobat and Distiller
Distiller should come with your installation of Acrobat by default. Check Acrobat's folder on your machine - If you're printing via the Xerox in East, a flash drive
If you're on a Mac that doesn't have normal USB ports, which is all modern Macbooks at this point (Apple is also a plague), find an adapter. You can check one out at the Library Tech Desk. - If you're printing via the Synergy Lab or Library, money on your Appcard
Make sure it's deposited to your Campus Cash, not Dining Dollars. Note that depositing online has a 20 dollar minimum and a service fee of 50 cents. Depositing in person at the Appcard offices on the second floor of the bookstore doesn't have a minimum amount nor a service fee. - For saddle stitching, waxed thread and a needle
You can also just staple down the spine if you're in a pinch, making a lot of copies, or just feeling lazy.
Instructions
Exporting the Pages
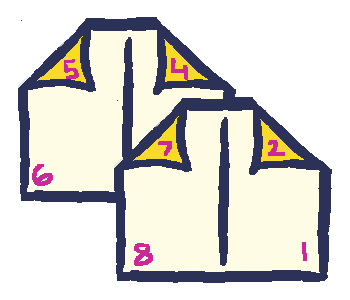
First of all, your total number of pages should be a multiple of four. Remember how I said you're printing four pages to each sheet? We'll go over the way of setting that up first. Think of it as printing from the outside in.
Open the Print Booklet menu from File > Print Booklet. Make sure that your Booklet Type is set to 2-up saddle stitch. Here, 2-up
means that you're printing two pages to each side of the sheet.
Click the Print Settings button and change the printer to Postscript File. Make sure that Print Blank Pages is enabled under the General tab.
If you're printing to a paper size larger than your zine itself, make sure you have crop marks toggled under the Marks and Bleed tab.
You're good to close out of the Print Settings menu and then click Print. This'll make Indesign export your zine as a Postscript file. Save it to somewhere that isn't your Downloads folder.
Running it Through Distiller
Open the Postscript file in Distiller. You can right click on the file and select Distiller from the Open With
dropdown.
If you're printing with a bleed and crop marks, you may need to change the page size settings to account for the extra space that they create. You can do this by going to Edit Adobe PDF Settings
under the Settings tab and adjusting the dimensions under the Default Page Size.
Once Distiller is done processing the Postscript file, it'll pop out a PDF in the same folder. You're nearly ready to print!
Final Checks on Formatting
If you have a bleed or crop marks, you'll want to throw your PDF onto a larger sheet of paper to account for the extra space. Open the PDF in Acrobat, select all the spreads, then right click and select Crop pages
. Change the page size to ledger and make sure you have Center checked.
Ready to Print!
If you haven't heard of printing on the long edge or the short edge, this refers to how the pages flip when they're printed— side to side like a book, or up and down like a notepad. Exactly how they'll flip also depends on the orientation of the sheets you're printing. Vertical sheets flip like a book printed long edge, and like a notepad printed short edge. Horizontal sheets flip like a notepad printed long edge, and like a book printed short edge. Remember to think about this in terms of the sheets of paper you're printing your spreads to, not the individual pages of your zine themselves.
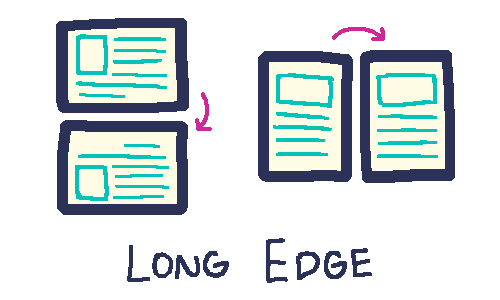
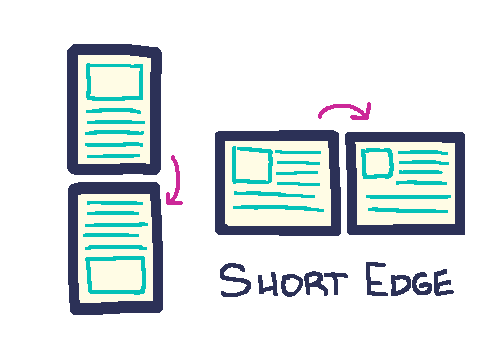
If your spreads are horizontal, and you intend for them to be flipped like a book, you should print on the short edge if your printer gives you the option to. If you can't find the option to change this, print a few spreads as a test to see what it does by default. If the backside of your sheets are upside down, then your printer is printing on the long edge, and you should flip every other spread on your PDF upside-down to correct it.
Binding and Saddle Stitching
Once you have your spreads printed, arrange them in order and get ready to bind!
The Saddle Stitch 101
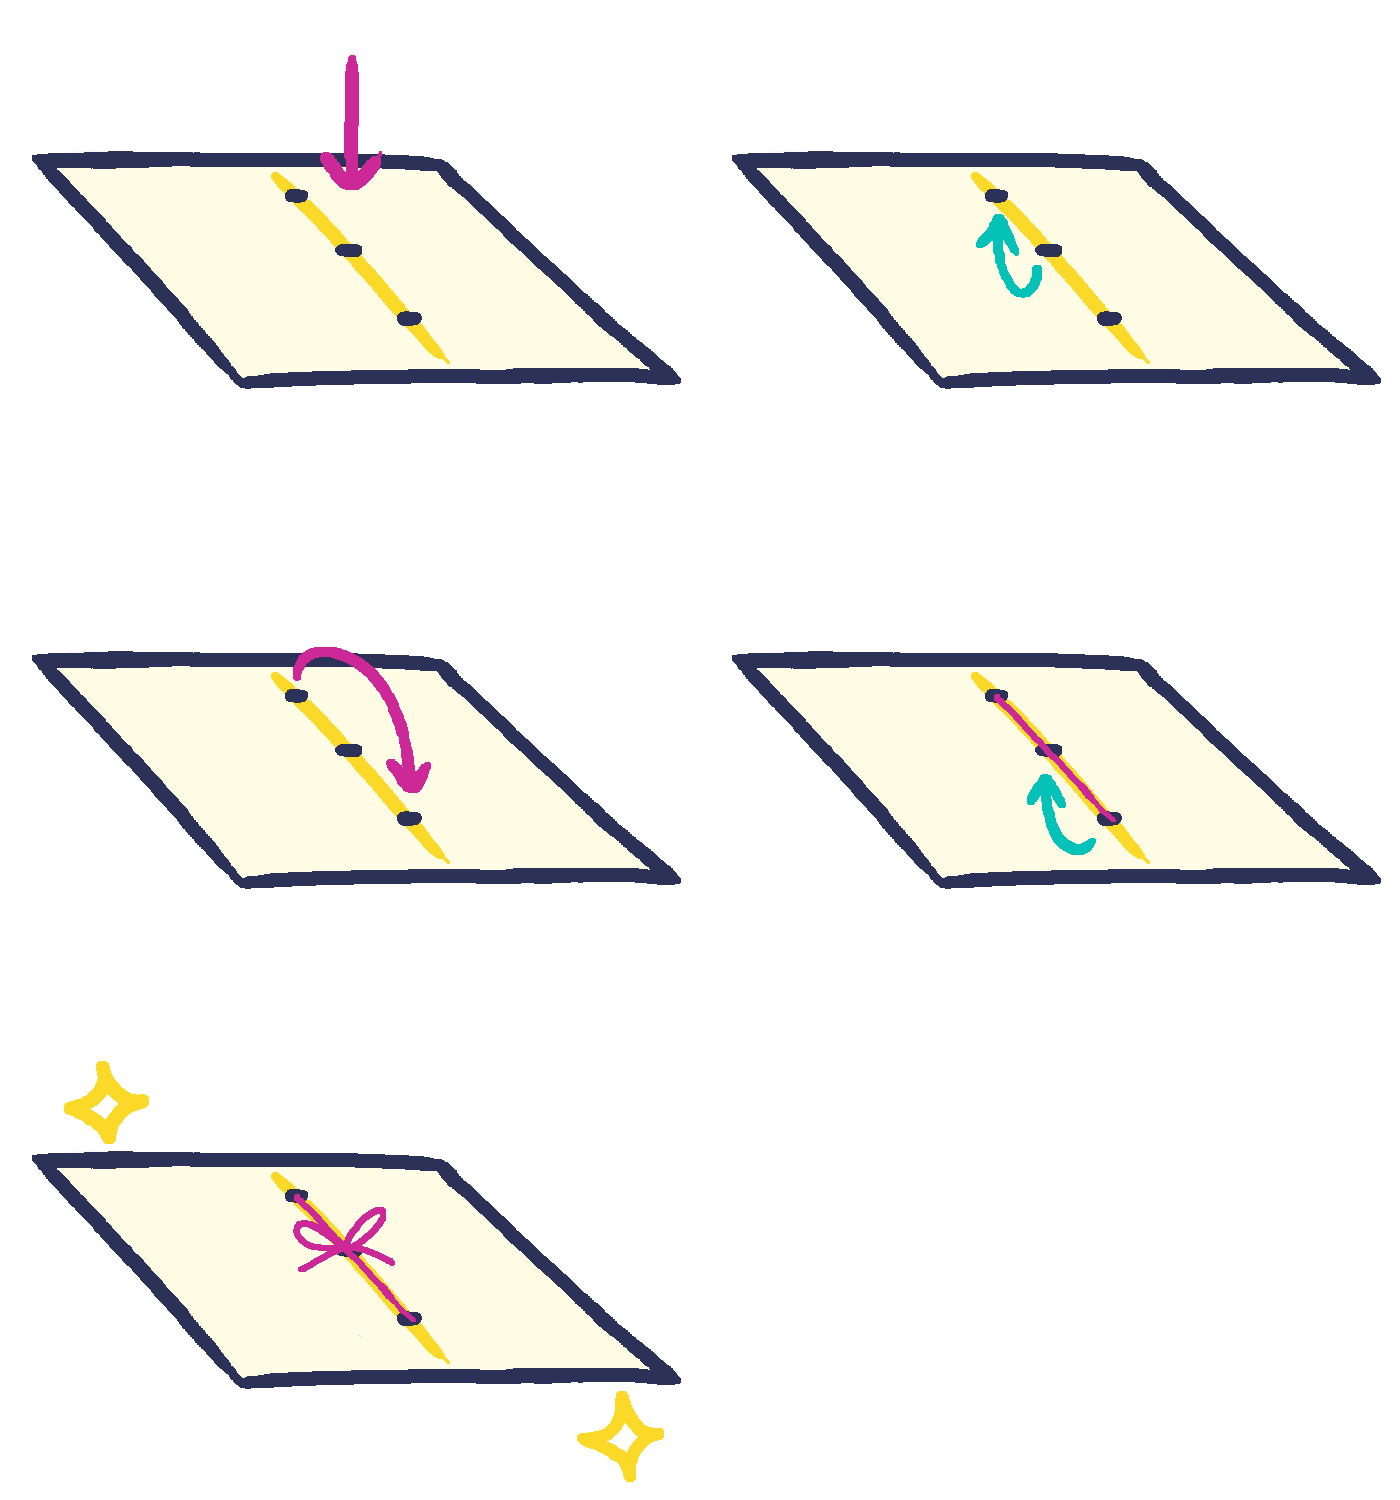
- With your zine open to its middle spread, poke a hole in the middle of the spine.
- Poke two more holes toward each end of the spine (but not all the way to the end!)
- Inside facing up, thread your needle and thread down into the center hole.
- Pull under and up through the top hole.
- Pull over and across, down into the bottom hole.
- Under and up, out of the middle hole where you began.
- Tie and cut the thread. Don't cut too close to the knot, otherwise it may come apart.
You're finally done! Enjoy your fancy saddle-stitched zine!